
Tuesday, December 15, 2009
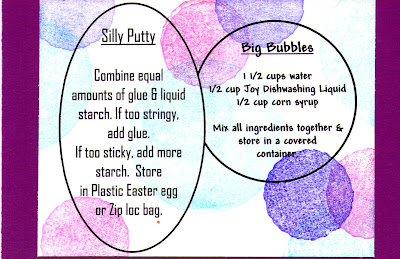
Silly Putty
As a coordinator to help with crafts at our local Mom's group one year we decide the ladies would make children friendly recipe scrapbooks. Each meeting the Mom's came together and created 2-3 pages 4"x6" pages that would be placed in a small photo-album. I made a number of books for gifts and continue to add recipes.
Wednesday, December 9, 2009
1 Wedding Dress = 3 Christening gowns

The original wedding gown.
I had a client that wanted 3 Christening gowns created from her heirloom wedding gown. The end result was 3 unique and original designed Christening gowns.
Now I am even more inspired to cut up my wedding dress and create my daughter's 1st communion dress next spring.
Dress #1


Dress #2


Dress #3


Click on the pictures to see a closeup.
Reconciliation Bulletin Board
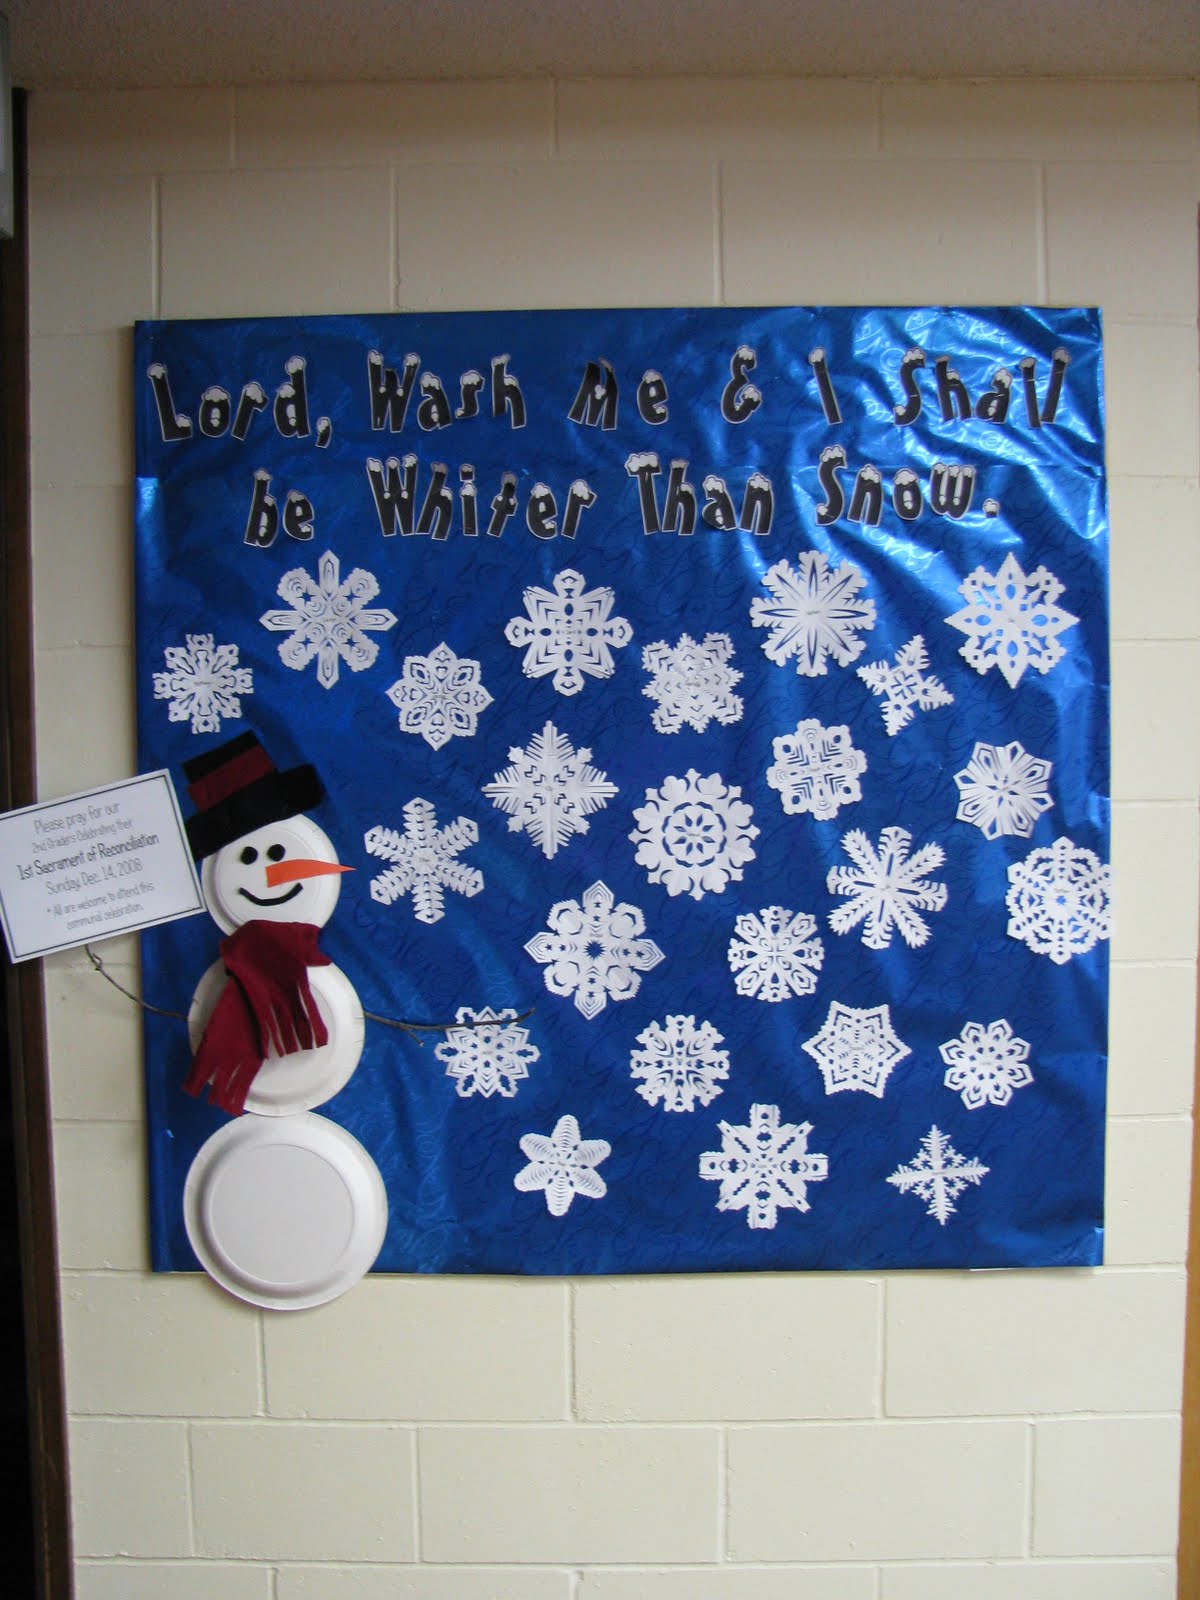
Lord Wash Me and I shall be Whiter than Snow.
I created this board to celebrate 1st reconciliation at our parish in December 2008.
In the center of each unique snowflake is the child's 1st name.
The snowflakes were created by using templates from the website Papersnowflakes.com and represent each person's uniqueness.

The snowman is asking for prayers from our parish as the youth celebrate this wonderful sacrament of healing.
Inspiration came from: http://www.boardsgalore.com/
Inspiration came from: http://www.boardsgalore.com/
Monday, November 16, 2009
Homemade Sidewalk Chalk
As a coordinator to help with crafts at our local Mom's group one year we decide the ladies would make children friendly recipe scrapbooks. Each meeting the Mom's came together and created 2-3 4"x6" pages that would be placed in a small photo-album. Once the year was over I continued to add more pages and create books for gifts.


A Lego Pool
 Creativity is always being expressed in our home. Our 11 year old son has been swimming with the local swim team for 6 years. On a rainy day this year he created this rendition of a pool and swimmers. His design has lanes, starting blocks and even a clerk of coarse. Once his masterpiece was finished he submitted it to the Lego Brickmaster monthly contest. Click here to submit your own Lego creation.
Sunday, November 15, 2009
The Pajama Diaries - ART

Click on the comic strip above to read.
This post is for my peers that I teach art with through the community center in Pella. And for all those Mom's out their that love to help their children create masterpieces and for all the Dad's that understand it is about the child creating the masterpiece. Thanks Mom and Dad!For those with a creative and artist gift it is sometimes hard to remember the definition of art. As described by Wikepedia: Art is the process or product of deliberately arranging elements in a way that appeals to the senses or emotions. It encompasses a diverse range of human activities, creations, and modes of expression, including music, literature, film, sculpture and painting. Each individuals emotions and senses interpret their views and thoughts differently making it ART.
Thursday, November 12, 2009
A Poster to be proud of

Our 9 year old daughter entered the local Knights of Columbus drug and alcohol awareness poster contest. We found out this week she won first prize. We are so proud her - Cograts Maddy!!! Now onto the state competition.
Madeline's Creation------>
Tuesday, November 10, 2009
A trip to the U of I Hospitals
Nothing creative to share today just praising God for his power to heal and trying to stay positive while praying and waiting for test results for so many other sick loved ones
We are back from Iowa City with Good News!!! . :-) Giving Praises! No follow up surgery is needed at this time for our 7 year old daughter, Callista. Her tests all looked really good. The swelling in the kidneys is gone. They appear to be functioning at a normal level. The reflux seems to be gone and the bladder looks great. The double re-implantation of her ureters seems to have worked. They are a little concerned about the way her body voids her urine. They have put her on a prophylactic dose of a new antibiotic and a muscle relaxer specific to the ureters and bladder area as well as a stool softener. We will return in 3 months for follow up tests. For now we are enjoying the good news.
While there the Child Life specialists came in and worked with her while they inserted her catheter and other tubes into her body. These ladies are such a God send. They are all so wonderful at helping the kids get through very unpleasant procedures. They found out she had just celebrated a birthday less than a week earlier and had to miss school that day because she was home sick with a UTInfection. When we got back to our room to meet with the specialist the two CL specialists walked into the room with 4 American Girl Dolls and told Callista to select one to go home with for her birthday and because she was so brave. I was speechless and had knots in my throat. Someone had donated their entire collection to give to the patients at U of I and for whatever reason these nurses decided to share one with Callista. They brought joy to our 7 year old during a very unpleasant experience.
Earlier in the day we had met a little girl about 8 years old that was just diagnosed with leukemia 4 days earlier. They were there with their suitcases and she was getting ready to receive her first round of Chemo. I just kept thinking how lucky I was to be able to take my child home at the end of the day. I will continue to lift that family up in prayer.
A bit off the subject but feeling the need to share. Our 11 year old son, Isaak was talking with us yesterday about just trying to blend in and not stand out too much in middle school. He has made some new friends this year while old friends have branched off into new cliques. He was sharing how confusing it was to not know who was his friend, who wanted to be his friend and who he wanted to be friends with. I told him that is why we have family. They will always be there to support
  us in good times and bad. He came back with, I know I will always have Luke and Henry as my buddies. (These little guys are his 3 and 6 year old cousins that love to play with Isaak when the family is together). So true. Feeling so blessed to have such wonderful families who are so supportive. I love them all so much!!!
We are back from Iowa City with Good News!!! . :-) Giving Praises! No follow up surgery is needed at this time for our 7 year old daughter, Callista. Her tests all looked really good. The swelling in the kidneys is gone. They appear to be functioning at a normal level. The reflux seems to be gone and the bladder looks great. The double re-implantation of her ureters seems to have worked. They are a little concerned about the way her body voids her urine. They have put her on a prophylactic dose of a new antibiotic and a muscle relaxer specific to the ureters and bladder area as well as a stool softener. We will return in 3 months for follow up tests. For now we are enjoying the good news.
While there the Child Life specialists came in and worked with her while they inserted her catheter and other tubes into her body. These ladies are such a God send. They are all so wonderful at helping the kids get through very unpleasant procedures. They found out she had just celebrated a birthday less than a week earlier and had to miss school that day because she was home sick with a UTInfection. When we got back to our room to meet with the specialist the two CL specialists walked into the room with 4 American Girl Dolls and told Callista to select one to go home with for her birthday and because she was so brave. I was speechless and had knots in my throat. Someone had donated their entire collection to give to the patients at U of I and for whatever reason these nurses decided to share one with Callista. They brought joy to our 7 year old during a very unpleasant experience.
Earlier in the day we had met a little girl about 8 years old that was just diagnosed with leukemia 4 days earlier. They were there with their suitcases and she was getting ready to receive her first round of Chemo. I just kept thinking how lucky I was to be able to take my child home at the end of the day. I will continue to lift that family up in prayer.
A bit off the subject but
 feeling the need to share. Our 11 year old son, Isaak was talking with us yesterday about just trying to blend in and not stand out too much in middle school. He has made some new friends this year while old friends have branched off into new cliques. He was sharing how confusing it was to not know who was his friend, who wanted to be his friend and who he wanted to be friends with. I told him that is why we have family. They will always be there to support
  us in good times and bad. He came back with, I know I will always have Luke and Henry as my buddies. (These little guys are his 3 and 6 year old cousins that love to play with Isaak when the family is together). So true. Feeling so blessed to have such wonderful families who are so supportive. I love them all so much!!!
Monday, November 9, 2009
Girls & Matching dolls
 A cape and one to match for the American Girl Bitty Babies. Christmas 2004 I designed animal print capes for my girls and nieces. When those were completed I decided to use the scraps to create matching capes for their Bitty Babies. Our youngest daughter is still wearing the Fuschia cape.
Friday, November 6, 2009
Swim Team Banner
 Last fall I created a new banner for our swim team. In recent years our team has doubled in size, going from 60 to 130. The team has started to travel and attend larger meets. The old banner was falling apart. With the guidance of our Swim Board I designed and created this new banner for the youth to carry when participating in the parade of athletes at such events.
Wednesday, November 4, 2009
A Grant Wood inspiration
 My parents celebrated 40 year's of marriage this summer. Each year our entire family attends the Iowa State Fair together and each year we create a t-shirt for all the children to wear. This helps the adults keep track of the children. This year I designed a shirt to commemorate my parents 40th.
This past spring we took our children to the Des Moines Art Center, while there we were able to see the traveling art display by Grant Wood. The most famous painting we saw was the pieced titled American Gothic. My inspiration to create these t-shirts came from the American Gothic painting.
I sketched in my parents faces, then added some details that were unique to them. My mom collects snowman so I placed a snowman on her broach. Dad had a farming accident years ago and lost 2 fin
 gers so I drew his hand on the pitch fork minus his two fingers. One of our favorite things to do when everyone is home visiting is to have a hot dog and marshmallow roast, on the pitch fork I drew two marshmallows and a hot dog. Dad has a special sun hat he wears during the summer so I sketched that on his head and in the background of the picture, is a drawing of the Big Yellow Slide the children love to go down at the Iowa State Fair.
Happy Anniversary Mom and Dad! We love You!
Monday, November 2, 2009
Dress Design for Shabby Apple Dresses
After visiting Shabby Apple Dresses I was motivated to put my BS Apparel Design degree to work and enter some original dress designs for their current contest. For years I have been creating original designs just ahead of the fashion curve. I have always dreamed about creating a design that would be manufactured for others to purchase. Often times I find myself looking for colors or designs that are not in the stores, so I create them myself. I am a conservative mother of 3 that likes to look fashionable but doesn't always feel fashion is for the more mature woman. When designing this collection I tried to keep the look classic and use current fabrics and techniques for embellishment. In this collection I used the same dress in 3 different colors and fabrics; All 3 versions focus on the lines created by the top stitching and all 3 have a neckline that can be worn buttoned closed or open laying flat.
My inspiration for this dress design evolved from another entry for this same contest. For my original design entry I was inspired by a pair of denim jeans that had decorative top- stitching. I sketched many dresses while working out the designs. When sketching this design I was also inspired by a swing coat I own.
The first sketch is show n using a black denim twill, brown wood buttons, and two rows of top stitching in taupe and white. Denim is for the more casual wearer and is popular with all women. This dress would be easy to care for and very comfortable. This style of dress could be dressed up with pumps or down with a fun pair of sandals. The collar could be worn open and a fun bright colored necklace could be worn to add a little spice. This dress could take you through all seasons and is a timeless classic.
 The second sketch shows the back of the dress in a hot pink soft cotton weave with white top-stitching. Fun white buttons are shown on the sleeves for an accent. The bow detail on the back brings in a feminine focal point and adds interest . The cotton fabric would allow the dress to breath and would be very comfortable on a hot summer day. This dress would be perfect for the woman that enjoys wearing color and walks with confidence. What better color to wear to an outdoor summer or spring wedding?
 The third sketch shows the dress made of a navy crepe with white top stitching. This sketch shows the dress with the collar open creating a v-neckline instead of a rounded neckline. For the woman that has a long neck she will want to wear the collar closed while someone with a shorter neck will want to wear the neckline open helping create a long slim line.
I chose navy because there are a number of women out there with cool colored skin wishing they could wear that basic black dress. Unfortunately black just washes them out. These women usually wear navy well. This dress would be a great alternative and perfect for those black tie events and formal nights out.
All 3 versions include 8 buttons on the front of the dress and 2 smaller coordinating buttons on the sleeve cuff. All 3 versions would have self lined collars so the woman wearing the dress could choose to wear the collar buttoned up or laying flat open. The bodice of this dress would be a tailored fit while the skirt would be A-line and flared a bit. The front of the dress would have two slash pockets hidden in the seams and would naturally open at the left knee to help with movement. Both the navy and pink versions skirt would be lined with a light weight lining while the denim version would not be lined.
My inspiration for this dress design evolved from another entry for this same contest. For my original design entry I was inspired by a pair of denim jeans that had decorative top- stitching. I sketched many dresses while working out the designs. When sketching this design I was also inspired by a swing coat I own.
The first sketch is show
 n using a black denim twill, brown wood buttons, and two rows of top stitching in taupe and white. Denim is for the more casual wearer and is popular with all women. This dress would be easy to care for and very comfortable. This style of dress could be dressed up with pumps or down with a fun pair of sandals. The collar could be worn open and a fun bright colored necklace could be worn to add a little spice. This dress could take you through all seasons and is a timeless classic.
 The second sketch shows the back of the dress in a hot pink soft cotton weave with white top-stitching. Fun white buttons are shown on the sleeves for an accent. The bow detail on the back brings in a feminine focal point and adds interest . The cotton fabric would allow the dress to breath and would be very comfortable on a hot summer day. This dress would be perfect for the woman that enjoys wearing color and walks with confidence. What better color to wear to an outdoor summer or spring wedding?
 The third sketch shows the dress made of a navy crepe with white top stitching. This sketch shows the dress with the collar open creating a v-neckline instead of a rounded neckline. For the woman that has a long neck she will want to wear the collar closed while someone with a shorter neck will want to wear the neckline open helping create a long slim line.
I chose navy because there are a number of women out there with cool colored skin wishing they could wear that basic black dress. Unfortunately black just washes them out. These women usually wear navy well. This dress would be a great alternative and perfect for those black tie events and formal nights out.
All 3 versions include 8 buttons on the front of the dress and 2 smaller coordinating buttons on the sleeve cuff. All 3 versions would have self lined collars so the woman wearing the dress could choose to wear the collar buttoned up or laying flat open. The bodice of this dress would be a tailored fit while the skirt would be A-line and flared a bit. The front of the dress would have two slash pockets hidden in the seams and would naturally open at the left knee to help with movement. Both the navy and pink versions skirt would be lined with a light weight lining while the denim version would not be lined.
A Bag of Jelly Beans

Two bags of Jelly Belly jelly beans. Mmm Good. The girls created these by using Giant ziploc bags filled with bright balloons. We printed off the Jelly Belly logo from the website and used giant safety pins to attach to their winter coats. They were ready to Trick or Treat and stay warm.
Sunday, November 1, 2009
A Fairy Birthday
Our daughter is turning 7 this week. We hosted a birthday party with 8 of her closest friends in attendance. What a great day!!!

The girls made masquerade wands. I cut out eye masks of black painted scratch art paper and glued them to a b lack painted wooden dowel, with a dragon fly attached. The girls embellished the wands with ribbons, sequins and feathers after scratching designs into the mask. Pre-cut masks can be purchased through Oriental Trading. For her cake I made miniature
 bundt cakes and turned them into dresses on Kelley dolls. Always remember to spray lots of Pam in the pan and flour good or the cakes will stick. I learned the hard way and lost most of my first batch. I used a butter-cream frosting and the Pampered Chef Easy Accent Cake Decorator to frost the cakes. Once I got going it went pretty smooth. The girls were in awe of the cakes and couldn't wait to eat them.
Using permanent markers the girls painted netting butterflies that were purchased fro m Oriental Trading. These were used as fairy wings on the cakes. When the girls were done eating the cakes, we washed the butterflies and hot glued the butterflies to a headband for the girls to take home.
In their goodie bags were a small pair of stretchy gloves to keep their hands warm when trick or treating later that night, a homemade fairy skirt, some lip gloss, a colorful pony to pu t in their hair, a bright pair of fairy wings and a deck of cards with 6 spoons and the directions of how to play spoons. During the party the girls played spoons while they waited for their parents to pick them up. A favorite game for our family to play when we have all ages together for celebrations.
A great party to celebrate our daughter's 7th birthday and wonderful way to bring joy after a long year. She has had two surgeries this year and may need a third. We are praising God for giving us such an angel and thank him for giving us the means to throw such a fun party for her. I thank the Lord for my creative mind and our beautiful family.
How to play Spoons:
Players: 3 to 13 players. Best with 6 to 13 players.
Deck: A standard 52-card deck. You also need one spoon for each player except one. EXAMPLE: With 8 players you need 7 spoons.
Goal: To be the first to collect four cards of the same rank and steal a spoon before everyone else.
Setup: Shuffle the cards and deal them to the players. Each player will have four c ards. Put the spoons in the middle of the table so that every player can reach them.
Gameplay: Players simultaneously choose one card from their hands, pass that card to the opponent on their left, and pick up the card they've received from the opponent on their right. Each player can never have more than four cards in his hand, so it's illegal for a player to pick up a new card before passing one to the left. When a player collects four of a kind, as subtly as possible, take a spoon. The last player to grab a spoon is the loser.
*OPTIONAL: Players who take a spoon can continue to pick up and pass cards, making it more difficult for other players to realize what has happened. (The player who actually collected four cards of the same rank must always pass the card they just picked up, because passing any other card would break up their four-of-a-kind.) Scoring: The last player to grab a spoon is the loser and is eliminated from the game.
*OPTIONAL: Each player has three lives. The last player to grab a spoon is the loser and loses a life. When a player loses all three of his lives he's eliminated from the game. Or The player left with out a spoon gets a letter with S being first then P-O-O-N-S. The last one to spell spoons wins.
Winning: The final two players in the game are co-winners.

The girls made masquerade wands. I cut out eye masks of black painted scratch art paper and glued them to a b
 lack painted wooden dowel, with a dragon fly attached. The girls embellished the wands with ribbons, sequins and feathers after scratching designs into the mask. Pre-cut masks can be purchased through Oriental Trading. For her cake I made miniature
 bundt cakes and turned them into dresses on Kelley dolls. Always remember to spray lots of Pam in the pan and flour good or the cakes will stick. I learned the hard way and lost most of my first batch. I used a butter-cream frosting and the Pampered Chef Easy Accent Cake Decorator to frost the cakes. Once I got going it went pretty smooth. The girls were in awe of the cakes and couldn't wait to eat them.
Using permanent markers the girls painted netting butterflies that were purchased fro
 m Oriental Trading. These were used as fairy wings on the cakes. When the girls were done eating the cakes, we washed the butterflies and hot glued the butterflies to a headband for the girls to take home.
In their goodie bags were a small pair of stretchy gloves to keep their hands warm when trick or treating later that night, a homemade fairy skirt, some lip gloss, a colorful pony to pu
 t in their hair, a bright pair of fairy wings and a deck of cards with 6 spoons and the directions of how to play spoons. During the party the girls played spoons while they waited for their parents to pick them up. A favorite game for our family to play when we have all ages together for celebrations.
A great party to celebrate our daughter's 7th birthday and wonderful way to bring joy after a long year. She has had two surgeries this year and may need a third. We are praising God for giving us such an angel and thank him for giving us the means to throw such a fun party for her. I thank the Lord for my creative mind and our beautiful family.
How to play Spoons:
Players: 3 to 13 players. Best with 6 to 13 players.
Deck: A standard 52-card deck. You also need one spoon for each player except one. EXAMPLE: With 8 players you need 7 spoons.
Goal: To be the first to collect four cards of the same rank and steal a spoon before everyone else.
Setup: Shuffle the cards and deal them to the players. Each player will have four c
 ards. Put the spoons in the middle of the table so that every player can reach them.
Gameplay: Players simultaneously choose one card from their hands, pass that card to the opponent on their left, and pick up the card they've received from the opponent on their right. Each player can never have more than four cards in his hand, so it's illegal for a player to pick up a new card before passing one to the left. When a player collects four of a kind, as subtly as possible, take a spoon. The last player to grab a spoon is the loser.
*OPTIONAL: Players who take a spoon can continue to pick up and pass cards, making it more difficult for other players to realize what has happened. (The player who actually collected four cards of the same rank must always pass the card they just picked up, because passing any other card would break up their four-of-a-kind.) Scoring: The last player to grab a spoon is the loser and is eliminated from the game.
*OPTIONAL: Each player has three lives. The last player to grab a spoon is the loser and loses a life. When a player loses all three of his lives he's eliminated from the game. Or The player left with out a spoon gets a letter with S being first then P-O-O-N-S. The last one to spell spoons wins.
Winning: The final two players in the game are co-winners.
Saturday, October 31, 2009
A Bichon becomes a Fairy

Our kids are gearing up for trick or treating tonight and our 7 year old is organizing all the last minute details for her birthday luncheon this morning. Our poor dog Max has been turned into a fairy. He is such a good sport. Check in tomorrow for pics from the fairy princess party.
Friday, October 30, 2009
Homemade Halloween Costumes & Decor
I love to make our children's Halloween costumes. As a stay at home mom I must always keep our budget in mind and not spend too much. I usually start digging through their closets to see what they have to work with. Now that they are older I get their input when creating the costumes. Here are a few costumes from years past.
 When our daughter was 6 months old I created a headband to look like a flower. Using a pinking sheers I cut out a fun printed fabric in the shape of petals. Then I hot glued the petals to a plastic headband. I placed the plastic headband over her bonnet so it wasn't pushing in on her head as headbands sometimes do. Last, I placed her in a flower pot. Tada - a blooming flower.
That year our 2 year old son decided he would go as a cowboy. Very easy - he loved his boots and owned lots of plaid flannels. A bandana and black cowboy hat was all we needed to finish off the look.
 When our son was 3 he wanted to be a pumpkin. I purchased an xxl orange t-shirt and painted a jack-0-lantern face on the front. I then threaded elastic through the hem at the bottom of the t-shirt. Once he put the shirt on we stuffed it with crumpled newspapers. He was able to wear his winter coat underneath the shirt - that was the best thing about this costume.
Our daughter was 1 1/2 when she was a flower-girl for her aunt Julie. I designed this dress to match the brides dress and hated to just put it away when the magical day was over. When Halloween approached just 4 weeks later we pulled out the dress. Off to the store to purchase some angel wings and a stop at the craft store. I made a halo out of wire Christmas trim and a white headband to complete the look. With very little work we had an angel. It was great to be able to have our daughter wear this lovely dress again.
 That same year I found a flying witch decoration that I couldn't resist. My husband suspended it from the outside of our home. We had no trees to post it on so he had to get creative with where to hang it. Once the witch was hung I decided to draw some ghosts out of inexpensive white poster board. Those were placed on the inside of our windows. We had many neighbors comment on how fun the decorations were and how they so enjoyed the windows.
Hope you are inspired to create something for your Halloween. Come back tomorrow for more from this year's costumes. Trick or Treat.
Thursday, October 29, 2009
A French Bustle

Altering wedding gowns is an art for me. Bustling the dress is one of my favorite things to do. It is usually the last sewing the needs to be done on a dress before steaming. The bustle shown in this picture is a french bustle. It was accomplished by using plastic nylon rings and color coded ribbons sewn under the dress. When I create a bustle for a bride I always try to keep it simple. It is always my goal to fashion a bustle that anyone can recreate on the bride's wedding day. When bustling a dress it important to make the bustle appe
 ar to be part of the dress with an even hem line and nothing hanging out or dragging on the ground. A well done bustle is important so the bride isn't tripping on her gown during the wedding dance. The back of the dress is also a part of the dress that is photographed during the first dance when the bride is dancing with her new groom. A sloppy bustle can equal a sloppy picture.
Tuesday, October 27, 2009
Dress Design for Shabby Apple Dresses

After visiting Shabby Apple Dresses I was motivated to put my BS Apparel Design degree to work and enter an original dress design for their current contest. For years I have been creating original designs just ahead of the fashion curve. I have always dreamed about creating a design that would be manufactured for others to purchase. Often times I find myself h
 unting for a look in the stores and cannot find it, so I create it myself. Two to three seasons later there in the stores being sold is the design I envisioned and wasn't able to find.
Women love to wear all shades of pink. Spring lines always include lots of v-necked black dresses but rarely anything in shades of pink. My goal was to create a traditional classic design using a feminine color with a little touch of interest. This dress was inspired by a pair of jeans. The jeans had two rows of top-stitching down the sides of the pants. One row of white the other pink. I began drawing designs that would show off the stitching. The design I ended up with draws the eye vertical creating a slimming dress. I chose to use pink cotton fabric with one row of taupe stitching and one row of chocolate stitching. To add a focal point and coordinate with the stitching I added 2 rows of chocolate brown lace rosette trim at the waist.
I envision this dress being made of
 a light weight flowing cotton weave in a soft bubblegum pink color. The square neckline has two rows of stitching similar to the vertical seam lines. The top stitching around the neckline creates interest allowing the wearer to get by with out wearing any jewelry or she could change the look by wearing a trendy necklace or classic pearls. To finish off the design I have placed eight buttons grouped in pairs down the back of the dress- you can only see six - the other two are found at the waist hidden in the trim. This button closure placket allows for an opening to get in and out of the dress while creating beautiful line and detail in the back of the dress. These buttons would have a chocolate pearl finish to coordinate with the pearls found in the trim at the waist.
It was my goal to create a dress that women of all shapes and sizes could wear and would want to wear. Women with a tall slender figure could wear the dress just as shown. Shorter framed women could remove the chocolate lace belt, giving them a long slender line not cutting them in half. Women who are wanting something a little more trendy could wear chocolate brown knee high boots or snake skinned heals. For a more conservative women she could wear classic brown pumps and white pearls around the neck to complete her look.

Dress Design for Shabby Apple Dresses - Sketches Coming Soon

I have been diligently working on a Design to submit for Shabby Apple Dresses.
My inspiration came from a pair of jeans I own that has contrasting stitching in white and pink.
I have chosen to design a soft bubblegum pink dress with taupe and chocolate brown stitching accents. I love to wear pink and don't see dresses made out of this fun color very often. The stitching on the dress will give it nice long vertical lines creating a slimming effect.
My Sketches are almost complete and ready to post. Fabric color has been found and trim is chosen. Hope you like the color and trim I have chosen. Come back to see my posted sketches tomorrow.
Monday, October 26, 2009
Thanks for Helping our Garden Grow

I am in charge of the bulletin boards for our church. This one was a favorite I
created to thank all the teachers that teach and work with our youth.
created to thank all the teachers that teach and work with our youth.

Only be careful, and watch yourselves closely so that you do not forget the things your eyes have seen or let them slip from your heart as long as you live. Teach them to your children and to their children after them. Deut. 4:9
Saturday, October 24, 2009
Easter Princess'

I designed and created these princess dresses a few years ago. The girls selected the fabrics and I began designing. Our daughters loved their bitty babies and requested matching dresses. I accepted the challenge and emerged a few hours later with matching doll dresses. The girls have long out grown those dresses but not the dolls. Many clothes have come and gone. Not these dresses they have been tucked away and are sure to be keepsakes.
Friday, October 23, 2009
T-Shirt Quilt

T-shirt quilts are an art for me. I do not like to use strip quilting as a technique. I want my clients quilts to be like no others. My goal is to create a quilt that represents the client. I try to utilize favorite colors, incorporate themes and always try to create something that will be a keepsake for years to come.
This quilt was made for a confident graduating high school senior. She loved bright colors especially hot pink.
Thursday, October 22, 2009
Apple Butter
 For Christmas every year we make homemade jellies, jams and fruit butters for our families. We pick the produce in the summer when it is ripe and hot outside, freeze it till the temps drop off. We then spend a cool cold fall weekend transforming our produce into wonderfully delicious homemade gifts that everyone can enjoy. Our favorite recipe and resource book is the Ball Blue Book. A must have for every kitchen.
Wednesday, October 21, 2009
A Traditional Bustle

 I do lots of bustles for brides. Creating unique and beautiful bustles is one of my favorite things to do. I love to help the brides feel like Cinderella.
This dress was absolutely breath taking and princess-like.
Most of the lace train was bustled under the opening in the back using hooks and thread loops sewn onto the train. The loops were hidden in the lace and made with tatting thread. Two small fabric covered satin buttons on top at the waistline were used to bring up the sides. This bustle took 7 points costing the bride $70.
All she needed was a veil, her glass slippers and her prince charming.
Tuesday, October 20, 2009
A Cowgirl
 Years ago I took an old pair of jeans with holes in the knees and turned them into Cowgirl pants for our daughter for Halloween.
These jeans soon became favorites. She wanted to wear them everywhere. It was great to recycle an old pair if jeans that were otherwise ready for the rag box. When she out grew them I took them to a consignment shop to be resold. The clerk said they were gone with-in a week. It was great to know some other child was enjoying them.
Monday, October 19, 2009
A tip to share

We purchased colored plastic transparent pencil boxes at the beginning of the school year for our children to neatly store their toothbrushes and toothpaste in. Keeps the counter free of clutter and germs contained in easy to clean containers. If there are no air holes drill small ones in the bottom so air can circulate and the brushes can dry. If your child has the flu or is diagnosed with strep throat remember to discard their toothbrush to prevent reinfection.
Subscribe to:
Comments (Atom)